In this blog we are going to build a simple Cli app that lists files in a directory and shows the content of a file in that directory. We will use Node.js to build this app. The aim of this blog is to show how we can intract with the console and output the result to the console.
01Prerequisites
- Node.js
- npm or pnpm ( I am using pnpm in this blog)
- git
02Setting up the project
Clone the starter
To help us get started faster we are going to clone a starter project from Github that supports typescript and eslint.
git clone git@github.com:henoktsegaye/node-ts-starter.gitgit clone git@github.com:henoktsegaye/node-ts-starter.git
Install dependencies
pnpm installpnpm install
03Reading arguments with process.argv
When running node on the terminal, anything passed while executing the file could be accessed from the process.argv array. The first element of the array is the path to the node executable while the second element is the path to the file that is being executed, the rest of the elements in the array are the arguments passed to the file.
For example, if we run the following command on the terminal.
node index.js --versionnode index.js --version
The process.argv array will look like something like this
1[2 '/usr/local/bin/node', // path to the node executable3 '/Users/USERNAME/node-ts-starter/index.js', // path to the file that is being executed4 '--version' // arguments passed to the file5]1[2 '/usr/local/bin/node', // path to the node executable3 '/Users/USERNAME/node-ts-starter/index.js', // path to the file that is being executed4 '--version' // arguments passed to the file5]
We can use this array to access the arguments passed and parse the arguments passed to do whatever we wanted to do( based on the arguments passed). For example, if we want to print the version of the app we can do something like this
1if (process.argv.includes('--version')) {2 console.log('0.0.1');3}1if (process.argv.includes('--version')) {2 console.log('0.0.1');3}
04Using npm packages
Why not parse by hand?
Using the process.argv array to parse the arguments passed to the file could be a bit slow and tedious and error prone if we have a lot of arguments to parse.
 There are a couple of great npm packages that could actually help us write this cli app faster but we could choose not to use those packages and write our own parser instead.
In this blog we are going to use some of this packages anyway to help us write this app faster.
There are a couple of great npm packages that could actually help us write this cli app faster but we could choose not to use those packages and write our own parser instead.
In this blog we are going to use some of this packages anyway to help us write this app faster.
The packages we'll use
Here are a couple of packages that we are going to use in this blog
- commander - help us to build a command line interface
- chalk - help us to style the output to the console
- inquirer - help us to build interactive command line interface
Once we have installed dependencies from the starter project , we can start to install our own dependencies.
pnpm install commander chalk inquirerpnpm install commander chalk inquirer
05Building the app
A CLI app is different in the way that the user interacts with the app, there is no UI or nice interface the user could click around. Instead users have to type commands to do everything , to even get help. Commander.js could actually help us on this. Commander handles parsing input from the command line that the user types and helps us to define custom commands and options for our app.
Let's see this in action.
Create the program
First let's start by creating a program from commander
1import { Command } from 'commander';23const program = new Command();1import { Command } from 'commander';23const program = new Command();
We created a program instance from commander. now we can start to define commands and options for our app. Let's start by defining a version for our app and a description.
1program.2version('0.0.1').3description('A simple cli app that lists and shows the content of a directory');1program.2version('0.0.1').3description('A simple cli app that lists and shows the content of a directory');
Parse and run it
Now that we have the basics we can call parse method on the program instance to parse the input from the command line and pass process.argv.
program.parse(process.argv);program.parse(process.argv);
Now we can run our app and see the version that we defined.
1pnpm run dev --version23# output 0.0.11pnpm run dev --version23# output 0.0.1
Add a --list option
Now let's define an option that lists the content of a directory. we can do that by calling the option method on the program object.
1program.2version('0.0.1').3description('A simple cli app that lists and shows the content of a directory').4option('-l, --list', 'list the content of a directory').5option('-s, --show <path>', 'show the content of a file').6parse(process.argv);1program.2version('0.0.1').3description('A simple cli app that lists and shows the content of a directory').4option('-l, --list', 'list the content of a directory').5option('-s, --show <path>', 'show the content of a file').6parse(process.argv);
List the files in a directory
Now that we have defined the options for the CLI app, we can start to implement the logic for each option.
1import fs from 'fs';2import chalk from 'chalk';34// previous code here56const options = program.opts();78// if the list option is passed we list the content of the directory9if (options.list) {10 fs.readdir(process.cwd(), {withFileTypes: true} ,(err, files) => {11 if (err) {12 console.log(err);13 return;14 }1516 const fileList = files.map((file) => {17 if (file.isDirectory()) {18 return {name:`📂 ${file.name}` , type: 'directory'}19 }20 return {name:`📄 ${fileList}` , type: 'file'}21 });2223 fileList.forEach((file) => {24 if (file.type === 'directory') {25 console.log(chalk.blue(file.name));26 } else {27 console.log(chalk.green(file.name));28 }29 });3031}32const readFile = (path) => {33 fs.readFile(path, "utf-8", (err, data) => {34 if (err) {35 console.log(chalk.red("Error", err.message));36 return;37 }38 console.log(data);39 });40}4142// if the show option is passed we show the content of the file43if(options.show) {44 readFile(`${process.cwd()}/${options.show}`)45}1import fs from 'fs';2import chalk from 'chalk';34// previous code here56const options = program.opts();78// if the list option is passed we list the content of the directory9if (options.list) {10 fs.readdir(process.cwd(), {withFileTypes: true} ,(err, files) => {11 if (err) {12 console.log(err);13 return;14 }1516 const fileList = files.map((file) => {17 if (file.isDirectory()) {18 return {name:`📂 ${file.name}` , type: 'directory'}19 }20 return {name:`📄 ${fileList}` , type: 'file'}21 });2223 fileList.forEach((file) => {24 if (file.type === 'directory') {25 console.log(chalk.blue(file.name));26 } else {27 console.log(chalk.green(file.name));28 }29 });3031}32const readFile = (path) => {33 fs.readFile(path, "utf-8", (err, data) => {34 if (err) {35 console.log(chalk.red("Error", err.message));36 return;37 }38 console.log(data);39 });40}4142// if the show option is passed we show the content of the file43if(options.show) {44 readFile(`${process.cwd()}/${options.show}`)45}
Now we can run our app and see the result.
pnpm run dev --listpnpm run dev --show README.mdpnpm run dev --listpnpm run dev --show README.md
Make it interactive with inquirer
Pretty neat right? its easy as that!
But Wait there is more.
Now that we have the basics. we want to add a prompt on the --list option to ask the user to select a directory / file to show the content of the directory / file.
Let's see this in action.
1import fs from 'fs';2import chalk from 'chalk';3import inquirer from 'inquirer';45const options = program.opts();67// Previous code here ...89// separate the logic for reading a file to a function ( make this easier to read / test)10const readDirectoryFiles = (path: string) => {11 fs.readdir(path, { withFileTypes: true }, (err, files) => {12 if (err) {13 console.log(err);14 return;15 }1617 const fileList = files.map((file) => {18 if (file.isDirectory()) {19 return `📂 ${file.name}`;20 }21 return `📄 ${file.name}`;22 });23 inquirer24 .prompt([25 {26 type: "list",27 name: "file",28 message: "Select a file to show the content",29 choices: fileList,30 },31 ])32 .then((answers) => {33 const file = answers.file;34 if (file.startsWith("📂")) {35 return readDirectoryFiles(`${path}${file.replace("📂 ", "/")}`);36 }37 console.log(chalk.green(file));38 readFile(`${path}${file.replace("📄 ", "/")}`);39 });40 });41};424344// if the list option is passed we list the content of the directory45if(options.list) {46 readDirectoryFiles(process.cwd());47}1import fs from 'fs';2import chalk from 'chalk';3import inquirer from 'inquirer';45const options = program.opts();67// Previous code here ...89// separate the logic for reading a file to a function ( make this easier to read / test)10const readDirectoryFiles = (path: string) => {11 fs.readdir(path, { withFileTypes: true }, (err, files) => {12 if (err) {13 console.log(err);14 return;15 }1617 const fileList = files.map((file) => {18 if (file.isDirectory()) {19 return `📂 ${file.name}`;20 }21 return `📄 ${file.name}`;22 });23 inquirer24 .prompt([25 {26 type: "list",27 name: "file",28 message: "Select a file to show the content",29 choices: fileList,30 },31 ])32 .then((answers) => {33 const file = answers.file;34 if (file.startsWith("📂")) {35 return readDirectoryFiles(`${path}${file.replace("📂 ", "/")}`);36 }37 console.log(chalk.green(file));38 readFile(`${path}${file.replace("📄 ", "/")}`);39 });40 });41};424344// if the list option is passed we list the content of the directory45if(options.list) {46 readDirectoryFiles(process.cwd());47}
In this new way we should be able to iterate over directories to list files and select files to view the content. We can run our app and see the result.
pnpm run dev --listpnpm run dev --list
You should see something like this
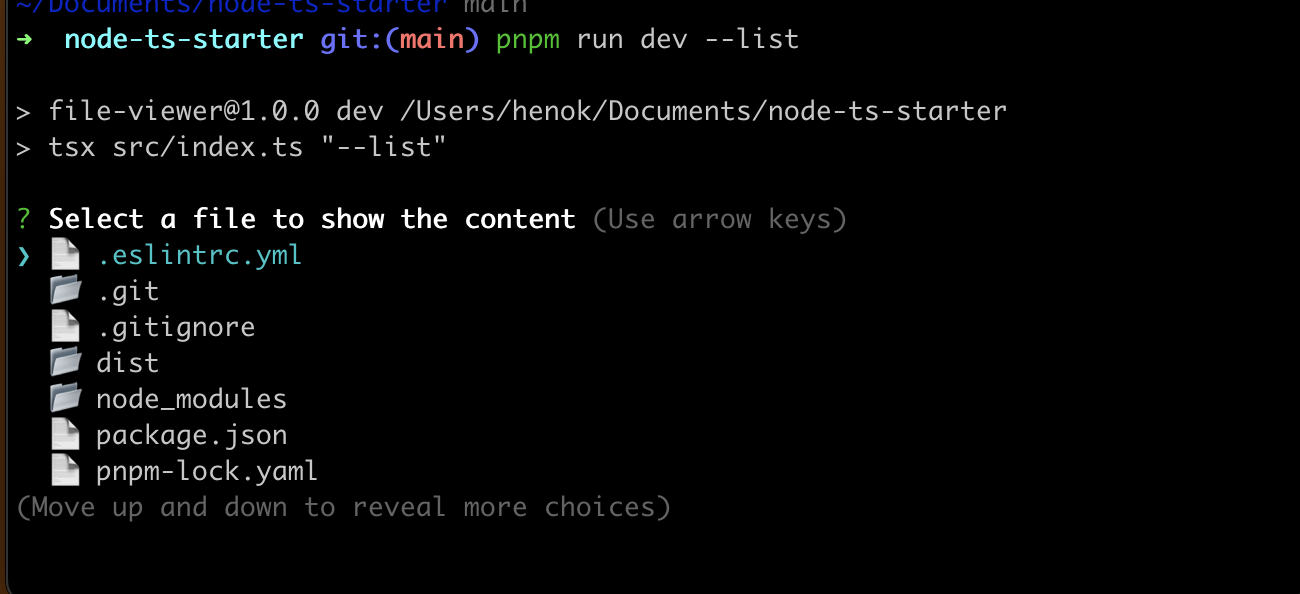
Now you can navigate through the directories and select a file to view the content.
06Wrapping up
In this blog we have learned how to build a simple CLI app with Node.js. We have learned how to use commander to define commands and options for our app. We have also learned how to use chalk to style the output to the console and inquirer to build interactive command line interface. you can find the source code for this blog here